

So- First off- holy fuck. how is it already the end of June? What.HAPPENED.
Secondly- we have a new domain! brickhousebdblog.com
WOOT WOOT I’m very excited- one step closer to my master plan.
Thirdly- I cannot believe how successful I’ve been (fans self) about keeping up here with you all. When I plunged in head first to blogging I had ZERO idea if I would be able to keep up with it- but here we are, 25 posts later and I’ve reached Italy, Germany, Canada, Netherlands, the UK, India, Ireland, Australia, Sweden, Kenya and Hong Kong and all over the US. The internet makes the world smaller- and I think it’s awesome that people from all over are able to read- and hopefully learn and enjoy the posts. So thanks all of you for supporting me in this path- it’s fricking cool AF.

Let’s jump right in!
Kicking off the month of June as usual was Make Up Monday, and- I have to confess to you all- I wound up taking this palette back. It’s lovely- but after a week- I realized my Melt Baby Girl palette and my Color pop Dream street palette– pretty much had all the same colors in it- except one of the green/teal shades, honestly- I don’t use that shade that much- I could live with out it. So I took it back- having the extra 36$ for new pants- or other make up was critical path. It’s a beautiful palette- and if you DON’T have anything like it- don’t be afraid to pick it up. (being said- I never got used to the weird shape and flip top way it opened- that was ANNOYING AF). But now you know, it’s great, but meh I have better. (sounds like x boyfriends right!)
June has been all about the fringe- just- fringe fringe fringe- so- if you’re really bored and need to put yourself to sleep, you can catch up on my fringe process in one of many posts about it this month!
Fringe, fringe, MORE FRINGE, and you guessed it EVEN . . . MORE FRINGE.
It’s exhausting- but HOW BEAUTIFUL IT IS!

But after all this work we start pulling into the final stretch for this costume and it’s just looking SO good. So keep with it- it’s a going to be a good one I promise you.
Half way through the month was crazy dance weekend of all dancing- I spent literally all weekend dancing- work friday night- 4 hours saturday and 6 hours Sunday dancing- and I was BEEEEEEEEEEAT. but so good. Please read all about the shenanigans in NYC here!


I adore my dance family- near and wide and I just had such a great experience up there. Thank you my dearest superhero husband for being my rock- but supporting my journey- I could absolutely not do this without you.
Following up I have a few other projects I work on while I’m mid fringe- you can see that here- I’ll keep you posted on these things most certainly- circle skirts galore and something of a surprise that I’m still collecting parts to complete!


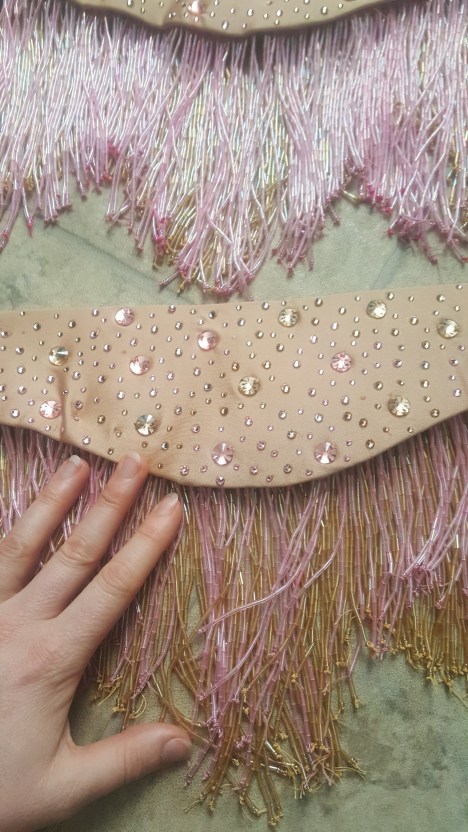
Finally- since I DID actually come to a close finish on the belt let’s talk about that! The pink fringe was finished Friday night- and at that point I realized I tend to fill in heavier on the right side of the fringe than the left WOMP WOMP.


Let’s talk glue. I was using Gem Tac- but I honestly have no idea where it was so these are the two I’ve been using. I think I was trying to throw out the elmers and I mixed them up and threw out the gemtac WOMP WOMP WOMP.
I MUCH prefer gemtac and E6000 to this elmers fabric glue- but it seems to be working okay- I’ll know after a few uses and another 30$ to fire mountain to replace them if it was worth it.

Saturday- I danced all morning- then lifted and then came home to delicious pizza and ot to work filling out the fringe gaps. Work cancelled Saturday night- I spent the time filling in the gaps on the belt and I’m VERY pleased with how this looks. The larger crystals were tacked down with E6000 then sewn down to the belt- since honestly the glue won’t hold those down.


Annoyed I managed to biff up the fringe ratio- but whatever- MOAR FRINGE CAPTAIN! MOAR! You can see here the top panel vs the bottom panel how much thicker and luscious the top is. That’s okay- the front panel should be easy to fix and adjust with another week or two of work (in theory)
So the downside to work on these fringe pieces completely separately can be seen here- even though I used my template- I adjusted the back panel sections to be a little longer (for das butt) and wanted the pink to be shorter than the gold- which I can adjust manually from the ribbon on the inside- but annoying because it means wasted time and materials. But- it IS a site.

And I think it looks really beautiful and I’m looking forward to getting this buttoned up. But- a few more tweaks here on the belt need to be done-
- Add density to front panel fringe
- Attach belt panels
- Determine where I need more fringe so the sides are not bare but not overlap fringe TOO much
- Finish the right side of that top panel with crystals.
- Do the bra(har har har)
And that is where June leaves us! I hope you enjoyed the wrap up and all the exciting fringe building- Next stop Bra Basics!!
Till next time fearless costumers!
