

Today- we talk about assiut! Yippee! ASSIUT ASSIUT ALL THE BEAUTIFUL ASSIUT. Also known as Tulle-Bi-Telli. Magical hand wrought liquid pleasure. Can we say that? is that a thing. Whatever- going with it.
Davina is the (to my knowledge) the leading expert here on the fabric and has spent hundreds of hours studying it she refers to it as the Cloth of Egypt. It’s a staple in bellydance costuming everywhere and is steeped in history. I would recommend picking up her book, The Cloth of Egypt, on etsy or amazon, 1000% worth your time. It’s worth the read to educate yourself and the pictures are absolutely stunning.
Personally, I just know it is the fabric of choice of goddesses and gods everywhere. It’s one of those things that elevates a costumes and performers from “nice” to “drool worthy”.
But enough rambling. You’re here for work. Me to. Let’s get to it.
I took an order to resize this assiut bra from WOWEE Bumble bee to 34D. This would be my first major resizing, and it was for a mentor. *gulp* YOU CAN DO IT! I said to myself. NO PROBLEM! And after doing what most artists do by procrastinating for many moons- I finally jumped right in: first things first. Document.
So first step was a video “walk around” the existing bra so I could refer back once I started taking it apart. I’ve included some of that video below for you. I didn’t take pictures and looking back- I wish I had done that. Lesson learned.
New Bra Base: I originally intended to make all new straps but as I was working, I realized the best option was to use the existing straps. This was partly because some of the things were glued- and partly because- the side bands I learned were a different animal as they ALSO helped covered the cups.
These coin bras are HEAVY. So reinforcing was important, nothing makes me more sad than saggy bras. For this costume I used a padded 34D, fairly sturdy, but I reinforced the top edge. To my knowledge- this is my own secret method. I haven’t seen anyone do this, they might, who knows- leave a comment below if you have! All I know is it works REALLY well for me. I’ve done 3 bras now and I am really pleased with the turn out. You can also just see the gore in the middle is reinforced with interfacing.

Repeat both sides!
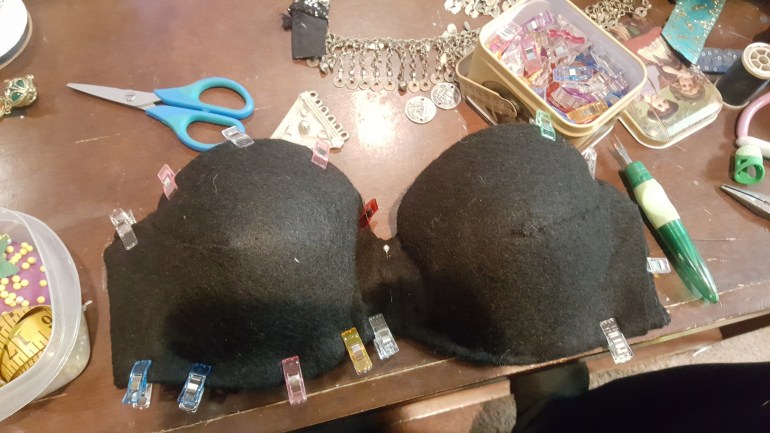
The felt not only helps stiffen the cups- but creates a smooth monochromatic surface (Assiut is, after all, a mesh)
Transfer straps- I do not believe at this point they were fully locked down but just tacked in place inside the cup (remember you still have to cover with assiut and finish the top edge- I’ll talk about this specific step on another post!)
As a note, I did so some work to the straps. The bands had enough length to not need an extension but I felt the halter straps were going to be short. I lost almost 1″ from cup size- so I did make an extension for the back across the neck (not shown). Something to consider when downsizing- you may have to make extensions since you’re moving the straps “in”. I find it easier to do this at the top of the straps rather than adding the extension to the side closest to the cup.

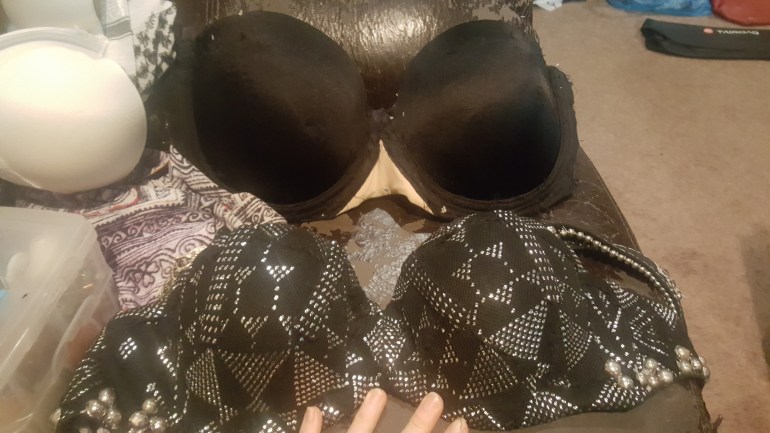
On to the next!!! This is the side strap pre removal!


I didn’t realize this still I started pulling the assiut off, but it wasn’t one large piece- it was SEVERAL- I wasn’t sure if I was relieved or stressed! The next few steps were several hours of carefully removing and replacing in order- I did one side then the next (picture on the right) so I could keep all the pieces and patterns in order. I’d recommend not rushing this.


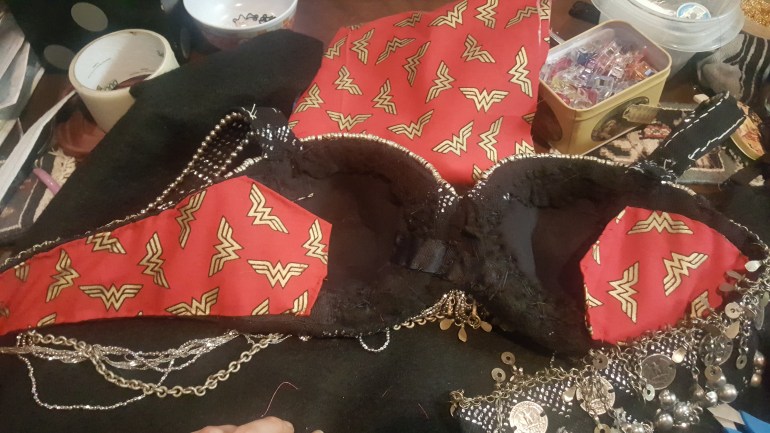
Replacing replacing replacing!


I finally got all the assiut moved over- I spent a long time eyeballing each cup back and forth to verify it matched and made sense shape wise on the bra itself- going smaller AND assiut has a propensity to stretch- so it was tricky! I spent a day or two with this and gave myself a visual break. I also messaged my friend to verify if I was going cross eyed or it was okay.
Once satisfied the straps were secure and all the assiut was in place I could move on!
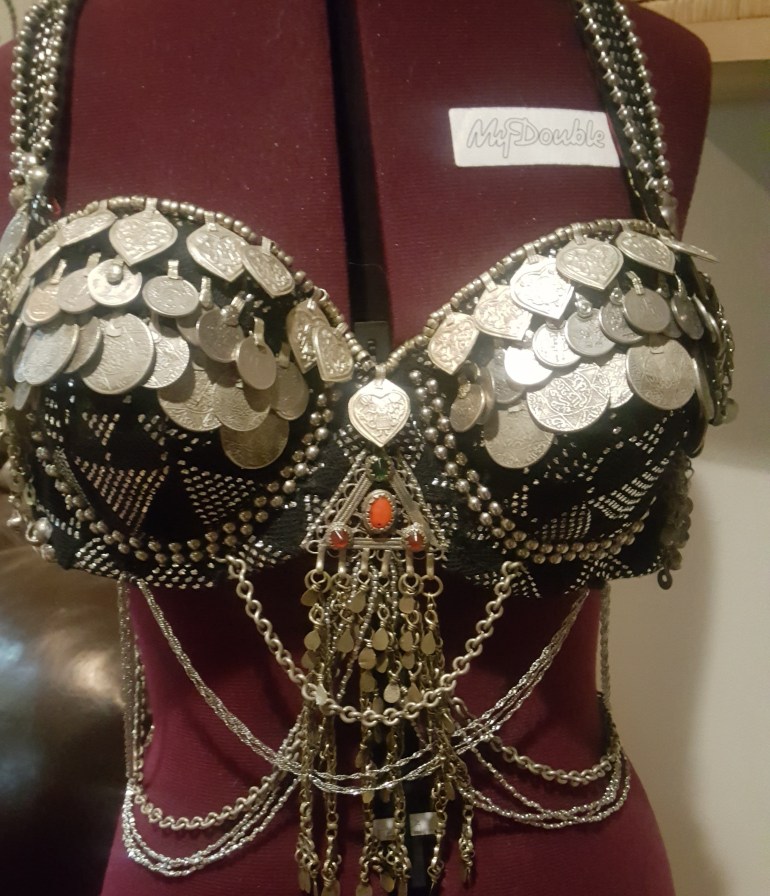
ON TO THE GOOD STUFF!
I started top down since it made the most sense and could adjust the lines of top edges. All the pins. Yes- you will get stabbed- it’s the inevitable. Embrace the masochism of it if you want this life.

And overall look as I’m working. You can see here below some of the layered pieces of assiut.

Once the icing is on the cake: pick your fancy lining to protect the inside and to make you smile every time you put your costume on!
And that’s when you can put down your needle and thread!
I was pleased to work on this and give her new life. I hope her owner is as happy as I am. All in all I think this took me about a month to recreate, working nights and weekends in my “spare time”.
Watch me try to learn something new! -DO ALL THE THINGS!
DRINK ALL THE COFFEE!

LEARN TO EDIT VIDEOS! Har har: Here’s a rough draft video documenting the work. This includes bits from the original walk through, steps along the way and a time lapse video. I think they are super fun and you can see cat shenanigans so BONUS! If you like them- you can check out more of them on my instagram BrickHouseBellydance –
And that’s all I have for today- I hope you all enjoyed reading and sharing in the process. This was a real treat to work on and I’m really pleased with the work. It was tons of fun.
Till next time fearless costumers!

I use a similar method for reinforcing bra cups, even for a meagre 32C-34B. Helps the bra stand up to the rigor of movement as well as to the weight of the decoration as we always store out bras either hanging or face up rather than face down which means gravity is always working against the cup.
A.
LikeLike
Yep- I have found I REALLY like what it does for the cups- so I’ve started doing it for all of them- even if it’s an extra step- it gives me more control over my bra and if I put wire in it- it holds up better to the bending back and forth!
LikeLike