
Welcome back fearless readers!
I have a hulk update AND a sewing nugget for you! Today we will look at making belt extenders for a belt that may be too small or just needs a little extra to get a better overlap on the sides.
Unfortunately- this is for my brand new belt. yeah yeah yeah- don’t @ me over the fact I need extensions for the belt I just started making.
I think there was *some* delusion about where I like to wear my belts and the fact I haven’t lost some lingering weight, AND the fact I put the two edges much closer together under the medallion than I originally planned when I cut them out. that being said- the edges barely met and had little to no overlap on either side *cue sad clown music*
Originally I think these were about 1-1.5″ apart and secured to the medallion directly.

Which- means- I needed to create little belt extensions for my belt- that’s almost fully beaded- as redoing the entire belt- is not realistic.
So I figured out how much I needed- and as we want to make it even, we cut out a piece for both sides!
Before we dive in- if you haven’t been following along- check a few of the recent posts here
- Hulk Rehab: Part 8
- Hulk Rehab Part 9
- Hulk Rehab: Part 10
- DDLC Showcase and Hulk Rehab: Part 11
- Tech Update and Hulk Rehab: Part 12
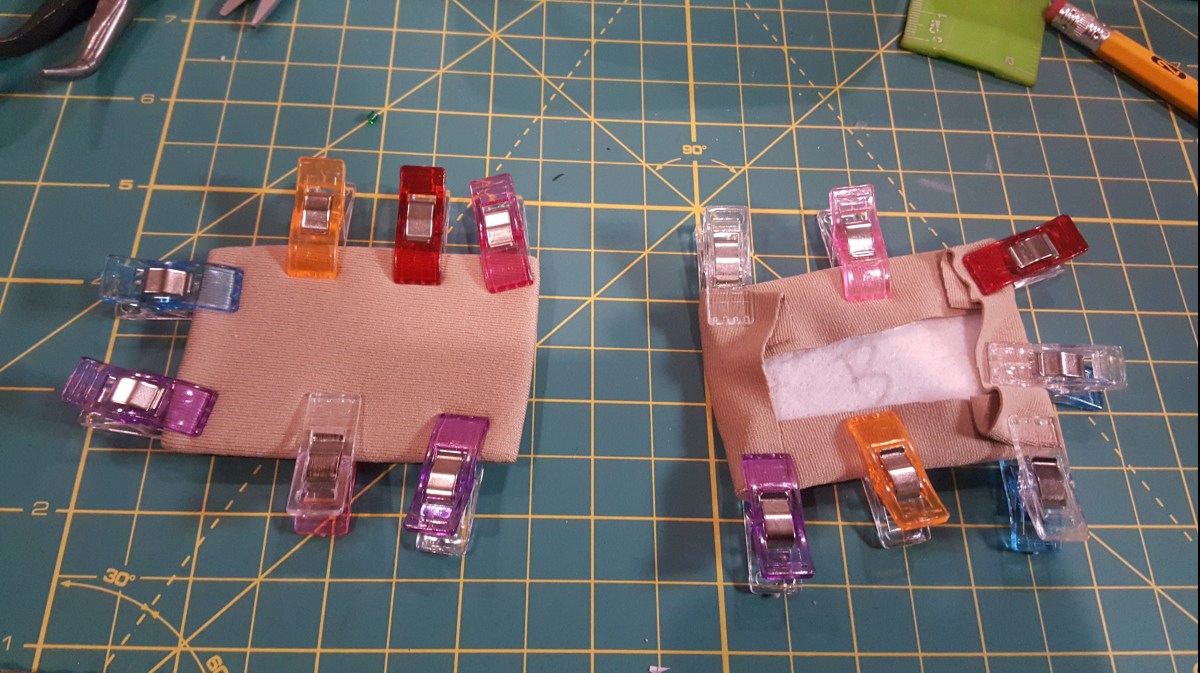
First step is to cut out interfacing to fill the gap, I lined up the edges so it was the same size as the belt with a good curve.

And then I cut two- and two pieces of fabric to cover them and used my wonder clips to clip it together, so you see the front and back of the two pieces.

And then sew it down!

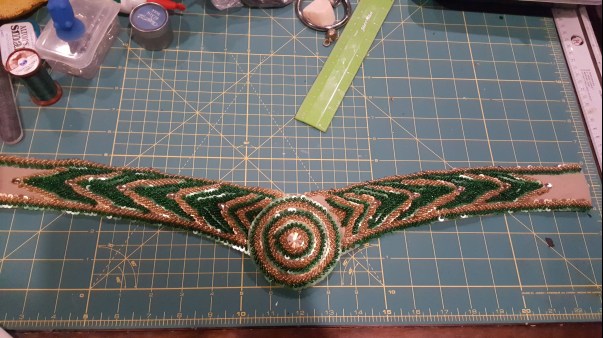
Once they are prepared, I start beading just like the rest of the belt. I’m going to make the choice to bead the whole thing and overlap it- which I recognize will cause some bulk, but will create some flexibility for a future owner should they want it.
I started with the gold- and did the green inside on the top, and green on the bottom and so forth and so on:


And do the second row and there we have little extenders!

Line it up and make sure it looks good then attach and decorate as needed to blend the pieces together- in my case that’s fairly easy. If you have anther belt with pieces that are fully filled out it mean taking some pieces off and moving them over to cover the space- but do what works best for you belt and your situation!

Till next time fearless readers!
